Easy Crustless Pumpkin Pie
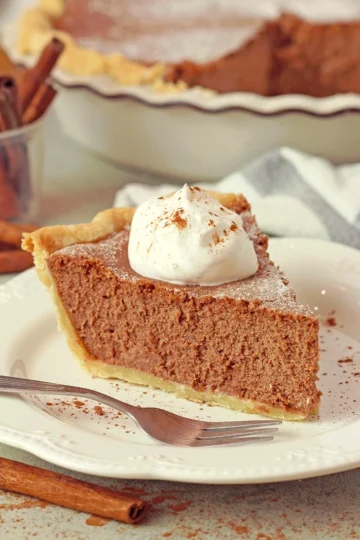
This Easy Crustless Pumpkin Pie is perfect Thanksgiving recipe that can be prepared in just a few minutes! No crust, fewer calories, and a total time-saver! Quick and simple, rich in flavor, creamy, and silky-smooth - this pie is the perfect choice for a fall dessert. Make it ahead of time and be ready for the holiday!

This pie is truly incredibly delicious - in every bite, you'll taste the flavor of pumpkin and the perfect blend of spices. You'll love how easy it is to make! Even if you're not experienced at baking desserts, you can prepare it easily - just follow the recipe to the end and be sure to read the tips and tricks. Once you make it, I'm sure you'll want to bake it again and again.

Why This Easy Crustless Pumpkin Pie Recipe Works:
Simple ingredients - like pumpkin, which is highly nutritious.
Quick and easy to make - this is the fastest and simplest pie I've ever made.
Gluten-free - perfect for anyone who avoids gluten.
Fewer calories - since there's no crust, it's lighter and ideal for anyone watching their calorie intake.

Necessary ingredients for Easy Crustless Pumpkin Pie:
- Granulated sugar
- ground cinnamon
- ground ginger
- ground nutmeg
- salt
- cornstarch
- eggs
- canned pumpkin puree
- vanilla extract
- evaporated milk
- baking spray or butter

How to Make a Easy Crustless Pumpkin Pie
Step 1: Combine the dry ingredients.
Mix together the sugar, cornstarch, salt, and spices.
Step 2: Mix the wet and dry ingredients.
Add the pumpkin purée, evaporated milk, eggs, and vanilla to the dry ingredients, and whisk until smooth and well combined.


Step 3: Bake.
Pour the mixture into a greased 9-inch pie plate and bake for about 50-60 minutes at 375°F
Step 4: Cool.
Let the pie cool first at room temperature, then refrigerate for about 4 hours.
Step 5: Serve.
Top with whipped cream and sprinkle with cinnamon.


Pro Tips & Tricks for the Perfect Easy Crustless Pumpkin Pie
Generously grease your pie plate.
Spray it well with nonstick cooking spray or brush it with butter. This will prevent the pie from sticking to the bottom of the dish.
Use a ceramic or glass pie plate.
These materials work best for this recipe. If you're using a metal pie plate, keep in mind that the baking time will be shorter!
Release air bubbles.
Before baking, firmly tap the pie plate on a solid surface a few times to remove any air bubbles from the batter.
Cover if the top darkens too quickly.
If the pie starts to brown too much on top, cover it loosely with aluminum foil and continue baking until done.
Don't overbake!
Start checking the pie around the 45-minute mark. It's done when a knife inserted in the center comes out clean. The edges should be set, but the center should still have a slight jiggle. The pie will continue to cook in the hot pie plate and will firm up more in the refrigerator.
If you overbake it, it may lose some of its creamy texture-but don't worry, it will still taste delicious!
Cool gradually.
When the pie is done, turn off the oven and crack the door open. Let the pie sit inside for 1-2 minutes to prevent the top from cracking due to a sudden temperature change.
Cool completely before refrigerating.
Let the pie cool fully at room temperature before placing it in the fridge. Don't cover it while it's cooling-this allows moisture to evaporate and prevents condensation, which can make your pie watery.

Recipe FAQ
Are pumpkin purée and pumpkin pie filling the same thing?
No, they're not the same. Pumpkin purée is made from 100% pure pumpkin, while pumpkin pie filling contains added ingredients like sweeteners, spices, and thickeners. For this recipe, use pumpkin purée. You can make your own by roasting and puréeing fresh pumpkin, but the easier option is to use canned pumpkin purée.
Can I use pumpkin pie spice?
You can, but I prefer using my own combination of spices for the best flavor.
Can I make it ahead of time?
Absolutely! Bake the pie, let it cool completely at room temperature, then cover it with plastic wrap or aluminum foil and refrigerate it for up to 2 days before serving. Add whipped cream and a sprinkle of cinnamon just before serving.
How do I store the pie?
Wrap it well and keep it in the refrigerator for up to 5 days.
Can I freeze it?
Yes! Once the pie has cooled completely, wrap it tightly in 2-3 layers of plastic wrap, then place it in a freezer-safe bag. It will keep in the freezer for up to 2 months.
How do I thaw the pie?
Remove it from the freezer bag and thaw it in the refrigerator overnight.

Similar Recipes You'll Love
This Maple Honey Pecan Pie is made without corn syrup - it's incredibly flavorful and perfect for Thanksgiving!
Chocolate lovers, I've got something special for you: Gooey Chocolate Brownie Pie, one of the most decadent pies on the blog!
Pumpkin season and the holidays are the perfect time to enjoy Pumpkin Lush, a creamy dessert that's love at first bite.
And if you're craving something a little different, try these Pumpkin Pie Tacos - creamy pumpkin pie filling served in crispy cinnamon tortilla shells!

Serve this Easy Crustless Pumpkin Pie for Thanksgiving or any cozy fall gathering, and everyone will be impressed!
If you enjoyed this recipe, subscribe to receive my free recipe newsletters - and don't forget to follow me on Pinterest, Facebook, and Instagram for more delicious ideas!

Easy Crustless Pumpkin Pie
This Crustless Pumpkin Pie is a super easy Thanksgiving recipe that can be prepared in just a few minutes! No crust, fewer calories, and a total time-saver!
Ingredients
- ¾ cup granulated sugar
- 1 teaspoon ground cinnamon
- ½ teaspoon ground ginger
- ¼ teaspoon ground nutmeg
- ¼ teaspoon salt
- 4 tablespoon cornstarch
- 2 large eggs
- 1 (15 ounces) canned pumpkin puree
- 1 teaspoon vanilla extract
- 1 cup evaporated milk
- whipped cream for serving
Instructions
- Preheat the oven to 375°F. Generously spray a 9-inch pie plate with nonstick baking spray or grease it with butter.
- In a large mixing bowl, combine the dry ingredients — granulated sugar, cornstarch, ground cinnamon, ground ginger, grated nutmeg, and salt.
- Add the pumpkin purée, evaporated milk, eggs, and vanilla extract. Whisk until smooth and well combined.
- Pour the mixture into the prepared pie plate. Bake for 50–60 minutes, or until a knife inserted into the center comes out clean — the center should still have a slight jiggle.
- Cool completely at room temperature, then refrigerate for at least 4 hours.
- Before serving, top with whipped cream and sprinkle with ground cinnamon.
Notes
Generously grease your pie plate.
- Spray it well with nonstick cooking spray or brush it with butter. This will prevent the pie from sticking to the bottom of the dish.
Don’t overbake!
- Start checking the pie around the 45-minute mark. It’s done when a knife inserted in the center comes out clean. The edges should be set, but the center should still have a slight jiggle. The pie will continue to cook in the hot pie plate and will firm up more in the refrigerator.
- If you overbake it, it may lose some of its creamy texture—but don’t worry, it will still taste delicious!
Cool completely before refrigerating.
- Let the pie cool fully at room temperature before placing it in the fridge. Don’t cover it while it’s cooling—this allows moisture to evaporate and prevents condensation, which can make your pie watery.
How do I store the pie?
- Wrap it well and keep it in the refrigerator for up to 5 days.
Can I freeze it?
- Yes! Once the pie has cooled completely, wrap it tightly in 2–3 layers of plastic wrap, then place it in a freezer-safe bag. It will keep in the freezer for up to 2 months.
Nutrition Information:
Yield: 9 Serving Size: 1Amount Per Serving: Calories: 162Total Fat: 5gSaturated Fat: 3gUnsaturated Fat: 2gCholesterol: 47mgSodium: 87mgCarbohydrates: 27gFiber: 1gSugar: 20gProtein: 3g


